How To Budget Your Money For Groceries | 9 Easy Steps To Keep You From Overspending
We may earn money or products from the businesses mentioned in this post.
This post is about budgeting money for groceries.
Your freshman year of college most likely comes with a meal plan, where you’ll have all of your meals prepared for you at a set price.
Your second year of college you’re likely to move off campus or still live on campus, but in an on college apartment. This year is where the budgeting comes into play.
Without a meal plan, it’s easy to just go to the store once every few days and pick and choose what you want to eat. This is a really easy way to make your food bill an astronomical price.
In this post I show you exactly how I budget my meals, and include some tips and tricks to cut down on general food costs.
HOW TO BUDGET YOUR MONEY FOR GROCERIES
1. CALCULATE HOW MUCH MONEY YOU CAN ALLOCATE TOWARDS YOUR MEALS.
Take a look at your income. What is it currently? Will you have an income at school? Are your parents giving you money for groceries?
If you have a general income, say $500 a month, take out necessary expenses. This includes rent, car insurance, whatever is your sole responsibility. (You’ll notice I leave in phone and essentials. I receive an allowance every month, and I try to keep my responsibilities within that allowance)
2. CHOOSE YOUR METHOD OF TRACKING AND RECORDING
For some people, this is a paper budget planner. I don’t recommend this. They’re easy to lose, and you have to do all of the math yourself. However, if you’ve used this method for awhile, it might be harder to try and make a big change. If it works for you, stick with it!
I highly recommend a spreadsheet, specifically in google sheets. If you’ve read my post about how I use google calendar, you’ll recall that I recommend using a personal google account and keeping all important documents in there.
Related: HOW TO USE GOOGLE CALENDAR
A lot of people like to use their school email when writing papers and keeping calendars and spreadsheets. This is NOT a good idea. Depending on what kind of school you go to, there’s a chance your school will deactivate your google account when you graduate – meaning you can never access previously written papers, or anything else under that google account.
Keeping your own google account and writing all papers, and keeping all calendars in there is key to making sure they stay safe. Then you can access old papers and spreadsheets throughout your entire academic career.
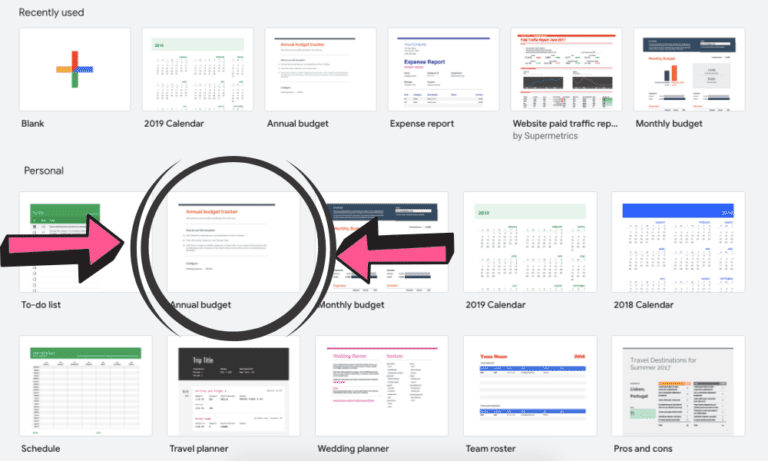
3. CHOOSE YOUR SPREADSHEET
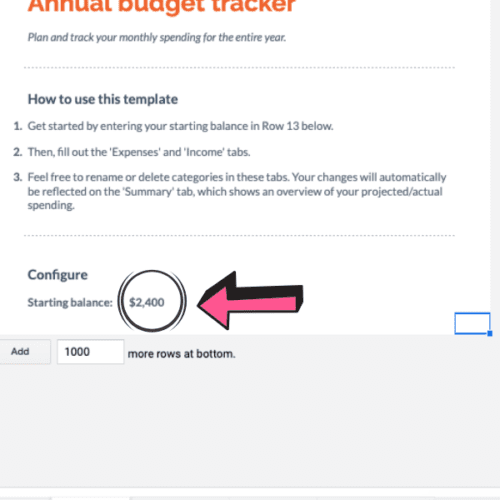
If you look under pre-made “templates” in google sheets, you’ll see an annual and monthly budget option. I recommend the annual one, to see how much you can spend each month.
On the first page of this spreadsheet, enter your starting budget. When you calculated your budget, you should have gotten this number through calculating your income, or what you’re able to take out of savings, and subtracting rent (if needed.) Multiply this monthly amount by the months you’ll be at school. For me, this is 8 months.
($300/month = $2400 for 8 months)
4. CUSTOMIZE SPREADSHEET
Next, customize your spreadsheet. You’ll notice a lot of extra space in this spreadsheet, but you can go ahead and just delete those rows (highlight and left click to delete entire rows.)
You may be thinking, why would I use a pre-made spreadsheet if I just have to delete a whole bunch of stuff out of it? Well, unless you know how to add the correct formulas and such into each row, you’ll want to start with a pre-made one.
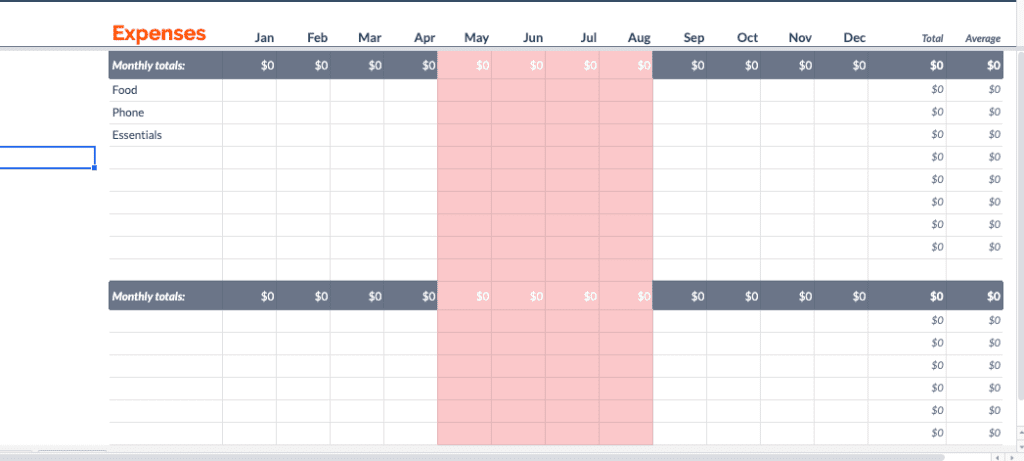
Here’s what mine looks like after I clean it up –
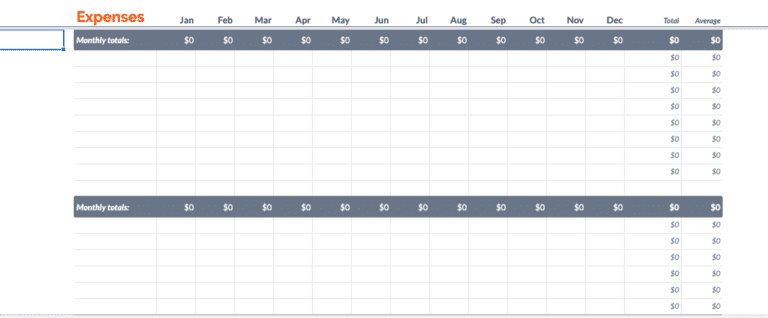

Then, add your groceries/necessities however you’d like to categorize them. I just simply have “Phone Bill,” “Food,” and “Essentials.”
*Take this step to also add your main title into the space where the blue box is in each of these screenshots. The spreadsheet won’t work without it*
5. ELIMINATE UNUSED MONTHS
For example, this is May, June, July, August for me. Now I know that my budget only needs to be split between the other months. Screenshots below.
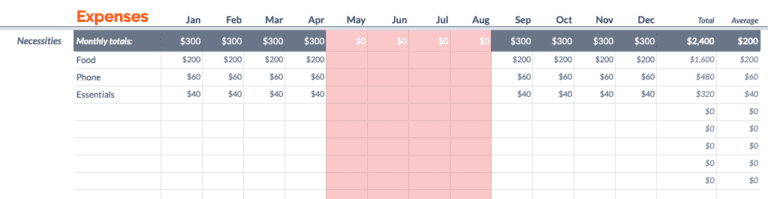
6. ENTER NECESSITIES
Now, enter your necessities. I start with phone, which is $60/month for me.
After that, I can look at the final page of my spreadsheet and see how much money I have left.

I see that I have $1,920 left over from my original $2400 after calculating in my phone bill every month. Now, I divide this amount by 8 (to fill 8 months on my spreadsheet)
$1920/8 = $240
I have $240 left per month to spend on food and necessities.
Related: 23 COLLEGE BEAUTY ESSENTIALS
7. FIGURE OUT COST PER WEEK
$240/4 (weeks) = $60/week
I find that I have $60/week to spend on food and necessities. I decide to allocate $10/week towards essentials – toilet paper, face wash, etc. and $50/week for food.
8. ENTER COST PER MONTH
So, to bring myself back to a monthly allowance, I have $40/month on essentials, and $200/month for food.
9. STAY UP TO DATE
Now that your spreadsheet is all set up, make sure that you’re updating your actual costs per month. On the “summary” tab you’ll notice that if you’re under spending or overspending the final total will change.
Make sure you don’t overspend, unless you underspent from previous weeks. I find that I don’t need an entire $50/week to spend on food, so I switched my budget to $30/week. Changing this completely, I looked at my ending total and saw that I would be able to save $640!
10. Don’t Skip Concealer
Concealer makes a huge difference in covering any imperfections in your face, and without the coverage of a foundation, you might feel a little bare if you’re just using a BB cream or tinted moisturizer.
Instead of having a thick, full coverage concealer that needs to be blended out, this lighter concealer still does the job without all the time blending.
TIPS TO REMEMBER
1. PLAY AROUND!
Play around with the spreadsheet! See how much you can save with how little you spend, and see which months you can spend less in (december, april) for example.
2. THE INCOME TAB
You might have noticed I didn’t touch the income tab. I set this spreadsheet up assuming that either you’re receiving the same amount of allowance every month, or you’re allocating an amount of savings for the upcoming years food costs.
If you know you’re going to receive different incomes each month, definitely add those in! The “summary” tab will instantly factor it into your final costs.
3. WORK THE SALES!
Challenge yourself to spend as little money on food as possible, but don’t starve yourself! Check ads, see who has the lowest prices, and check other places in your budget where you could cut back on spending. You’d be surprised how much centering a weekly meal plan around the ads can help you.
I sit down every sunday with the ads, my computer, and a calculator and I make the next week’s menu. I think of what I could freeze, and I try to always base big purchases, usually meats and produce, around what’s on sale and what I can get discounted.